
Then, I was called to be the ward camp director. I have no idea how to camp. Even more frightening to me is that I don't know a lick about cooking while camping. The poor girls of our ward may starve unless I learned how. This seemed like the perfect time to get a firepit so that I could practice my campfire cooking skills. So today I woke up and said, "Let's build a firepit!" And my family said, "Yes!" (But I know deep down they were saying, "Ugh!!"
Supplies needed:
36 - 12 inch retaining wall bricks
5 - 0.5 cubic feet bags of river rock
4 tubes of concrete adhesive
We headed to Home Depot where we bought some of the supplies we needed. We also had to go to Walmart because once we put all the bricks in our van, we didn't dare add the weight of gravel. The poor van was a low-rider.
While Trent and Adri picked up the gravel and adhesive, Kenna and Katy and I did some digging.

I should have taken a pic of the pre-digging step. We laid the bricks out in a circle, two deep. Then we used a shovel to Mark where our outline was. The inside ring would be the pit and the outside ring was for the gravel. Then we moved all the bricks and started removing the grass. Once it was all out then a little raking got it all leveled out.

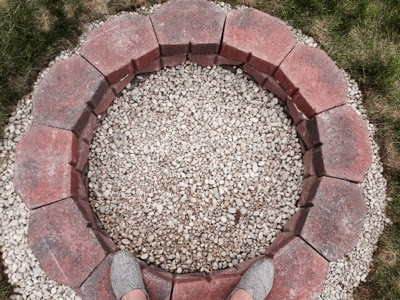
Next we filled the dirt area with the river rock. All the gravel had been sold. The small river rock actually looks better and probably will work better. Then we began placing the bricks. The bricks we bought had a lip on it for a retaining wall. So with each layer, the wall tapered in and got smaller. This was going to force us to cut a brick, without any tools, and our pit was going to have a slimmer opening than I was wanting. Solution? Knock off the lips with a mallet, hammer, and screwdriver. Those are the tools of real DIYers.

Each brick was leveled on the bottom layer. (As I am not much of an exact science type, it was Trent who helped make it near perfect.) for the second layer, we added concrete adhesive to each brick and placed it on top. Then the third layer was made the same way. Then we covered the bottom of the pit with a couple more bags of rock. Within an hour or so, the whole thing was quite sturdy and ready for a fire.
Tonight We enjoyed hot dogs, bratwurst, s'mores, and lots of smoke. I think this was the easiest DIY project we have ever attempted and it turned out well. We had some great laughs and made good memories. Now the memories will continue as we build fires and enjoy outdoor cooking for years to come! And be ready family. You are about to become the guinea pigs for my camp cooking.